When you analyse a project with SonarQube you are running the analyser with a predefined set of rules – they are the most commonly used rules, but not the most comprehensive.
This has a lot of sense, because you might not want to end up cluttering the dashboard with tons of information you don’t actually need or that you can’t work on now.
Here is where custom Quality Profiles come into play. For example, I might want a specific build definition to be used for Code Analysis with all the rules enabled.
After creating a new, empty Quality Profile all I need to do is to search for the rules I want and add them to my custom profile. Searching is quite a powerful experience – you can rely on really a lot of criteria, aside from the simple search on the name.
But in this case, the name (CA, which is the code for each Code Analysis rule ran by Visual Studio) will do:
Here you can select which rules you want to go into the profile. If you want all of them, just go for the Bulk Change button on the top right hand side:
You need to type in the name of the profile now:
That’s it!
Now you need to create a new SonarQube project to use this custom quality profile:
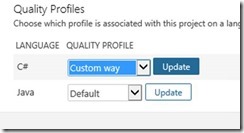
From the Administration menu, select Quality Profiles so you can change the default one with your custom profile:
Eventually, configure the new build definition with the same parameters for the SonarQube analyser:
Now you can run the build as usual, and this project will have different results (of course!).


