You might have got it - I am very, very keen on YAML Build and Release Pipelines, because they unleash the power of a full-fledged orchestrator in a single format: YAML files.
A friend of mine is very excited about them, but he is puzzled by the fact that the Environments page only shows Kubernetes resources. While there is clearly a focus on Kubernetes, this does not mean that you can only use multi-stage CI/CD definitions with it. You can definitely convert your existing pipelines, targeting your current applications!
Let’s take a simple example: a Build Definition that creates a MSDeploy package and a Release Definition that consumes the Build Artifacts and deploys an ARM template and the aforementioned package. You surely saw some tutorial or example on how to achieve this in UI-based (a.k.a. Designer, Classic, etc.) Pipelines, but how to do the same with YAML?
First of all, this is all contained in a file - I am simply going to look at different portions at different times. You can also split them, but for the sake of simplicity I am going to use the whole file as a baseline.
stages:
  - stage: Build
    jobs:
    - job: Build
      pool:
        vmImage: 'vs2017-win2016'
      steps:
      - task: NuGetInstaller@0
        displayName: 'NuGet restore'
        inputs:
          solution: '**\*.sln'

      - task: VSBuild@1
        displayName: 'Build solution'
        inputs:
          vsVersion: 15.0
          msbuildArgs: '/p:DeployOnBuild=true /p:WebPublishMethod=Package /p:PackageAsSingleFile=true /p:SkipInvalidConfigurations=true /p:PackageLocation="$(build.stagingDirectory)" /p:IncludeServerNameInBuildInfo=True /p:GenerateBuildInfoConfigFile=true /p:BuildSymbolStorePath="$(SymbolPath)" /p:ReferencePath="C:\Program Files (x86)\Microsoft Visual Studio\2017\Enterprise\Common7\IDE\Extensions\Microsoft\Pex"'
          platform: 'x86'
          configuration: 'Release'

      - task: CopyFiles@1
        displayName: 'Copy Files'
        inputs:
          SourceFolder: '$(build.stagingDirectory)'
          Contents: '**/*.zip'
          TargetFolder: '$(build.artifactstagingdirectory)'
      - task: CopyFiles@2
        displayName: 'Copy Files'
        inputs:
          SourceFolder: '$(build.sourcesdirectory)'
          Contents: '**/*.json'
          TargetFolder: '$(build.artifactstagingdirectory)'

      - task: PublishPipelineArtifact@0
        displayName: 'Publish Pipeline Artifact'
        inputs:
          artifactName: 'drop'
          targetPath: '$(build.artifactstagingdirectory)'
This is our Build stage. Nothing too fancy - we use a Windows Server 2016 with Visual Studio 2017 Agent VM provided by the Microsoft Hosted Build Pool, and there we run the usual suspects: NuGet restore, Visual Studio Build, Copy two types of artifacts in the Artifacts Staging Directory and then we use the new Publish Pipeline Artifact to publish the drop folder. This new task is made with YAML Pipelines in mind, and it is definitely the recommended one to use.
Now you need to consume the Artifacts. You can do this in the Deployment stage:
  - stage: Deploy
    jobs:
    - deployment: DeployWeb
      pool:
        vmImage: 'vs2017-win2016'
      environment: 'target'
      strategy:
        runOnce:
          deploy:
            steps:
            - task: DownloadPipelineArtifact@0
              inputs:
              artifactName: 'drop'
              targetPath: $(System.DefaultWorkingDirectory)
            - task: AzureResourceGroupDeployment@2
              inputs:
                azureSubscription: 'ACME Azure'
                action: 'Create Or Update Resource Group'
                resourceGroupName: 'Demo'
                location: 'West Europe'
                templateLocation: 'Linked artifact'
                csmFile: '**/FullEnvironmentSetupMerged.json'
                csmParametersFile: '**/FullEnvironmentSetupMerged.param.json'
                overrideParameters: '-WebsiteName PULE2E -PUL_ServerName PULE2EServer  -PUL_HostingPlanName PULE2EHP
                deploymentMode: 'Incremental'

              ...other stuff to deploy database and web server...
The cool part here is that you can use the same file, and the same language to perform the operations you are accustomed to. If you (like me!) need help with the YAML syntax, use the YAML Assistant and it will take a mere five minutes to get to the results you need.
The graphical result you can see in the whole run is this:
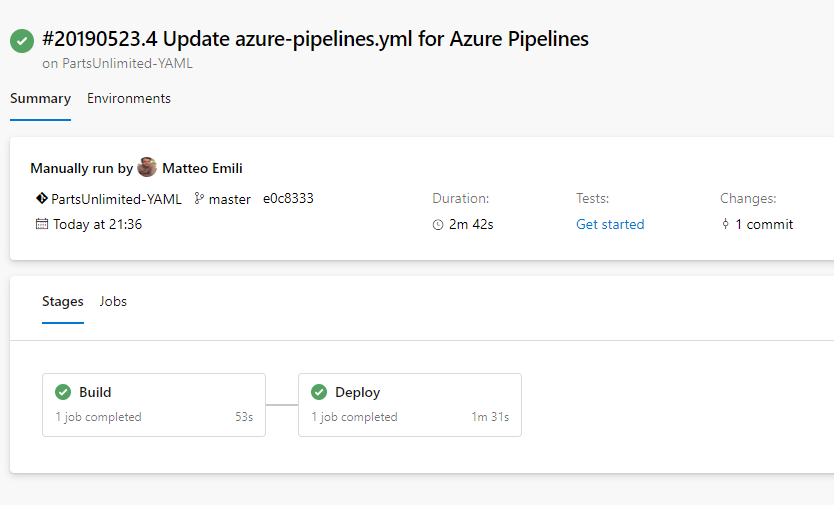
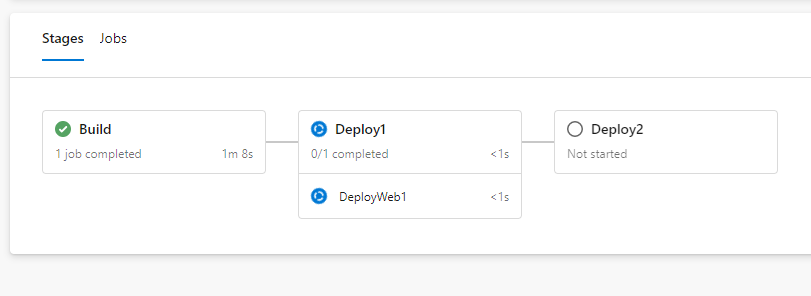
In this case, it is going to be only two stages. Needless to say that if you have more, you will have more (hopefully green!) boxes. And if you need them, you can also have multiple jobs within a single stage. It’s all about what you put in the YAML definition. This is an example with three stages, one job each:
  - stage: Deploy1
    jobs:
    - deployment: DeployWeb1
      pool:
        vmImage: 'vs2017-win2016'
      environment: 'target1'
...
  - stage: Deploy2
    jobs:
    - deployment: DeployWeb2
      pool:
        vmImage: 'vs2017-win2016'
      environment: 'target2'
...