I was discussing this with a colleague a couple of days ago (if you are reading this, hi Keith!): can we easily build a build matrix with Azure Pipelines?
A build matrix is something that comes out of product-based companies: you have a single code base that you need to build across multiple permutations of operating systems, software versions, etc. Think about the pre-requisites of your favourite PC videogame or your trusted software you carry with you since God-knows-when - each one of them will have a support matrix behind them, dictating if and how you can get support from the manufacturer. It also means that if yoiu end up within these pre-requisites, chances are your problem has already been identified, documented (and fixed!) as part of a regular testing strategy.
You can do that fairly easily with Azure Pipelines - the documentation has got an example. Is it enough though? I thought about digging deeper - not just stopping at the multiplatform side of the story. And everybody knows about my allergy to JavaScript…
With a moderately complex application there are a number of tasks you need to carry on. Take a simple .NET Core application - you need to restore your dependencies for each project you need to build, compile, run at the very least a suite of unit tests, then package your artifacts and upload it for downstream consumption into each environment. Something resembling this, perhaps…
trigger:
- master

pool:
  vmImage: 'windows-latest'

variables:
  solution: '**/*.sln'
  buildPlatform: 'Any CPU'
  buildConfiguration: 'Release'

steps:
- task: DotNetCoreCLI@2
  displayName: "Restore"
  inputs:
    command: 'restore'
    projects: '**/*.csproj'
    feedsToUse: 'select'

- task: DotNetCoreCLI@2
  displayName: "Build"
  inputs:
    command: 'build'
    projects: '**/*.csproj'

- task: DotNetCoreCLI@2
  displayName: "Unit Tests"
  inputs:
    command: 'test'
    projects: '**/tests/UnitTests/UnitTests.csproj'

- task: DotNetCoreCLI@2
  displayName: "Publish Infrastructure"
  inputs:
    command: 'publish'
    publishWebProjects: false
    projects: '$(Build.SourcesDirectory)/src/Infrastructure/Infrastructure.csproj'

- task: DotNetCoreCLI@2
  displayName: "Publish ApplicationCore"
  inputs:
    command: 'publish'
    publishWebProjects: false
    projects: '$(Build.SourcesDirectory)/src/ApplicationCore/ApplicationCore.csproj'

- task: DotNetCoreCLI@2
  displayName: "Publish Web"
  inputs:
    command: 'publish'
    publishWebProjects: true

- task: CopyFiles@2
  inputs:
    SourceFolder: '$(Build.SourcesDirectory)'
    Contents: |
      src\ApplicationCore\bin\Debug\netstandard2.1\ApplicationCore.dll
      src\Infrastructure\bin\Debug\netstandard2.1\Infrastructure.dll
      src\Web\bin\Debug\netcoreapp3.1\Web.dll
      src\Web\bin\Debug\netcoreapp3.1\Web.Views.dll
    TargetFolder: '$(Build.ArtifactStagingDirectory)'

- task: PublishPipelineArtifact@1
  inputs:
    targetPath: '$(Build.ArtifactStagingDirectory)'
    artifact: 'drop'
    publishLocation: 'pipeline'
Now, awesome. But what if you want to support two different .NET Core versions and all the major operating systems, in at least two versions? In a regular scenario, it means either a lot of overhead or a lot of interaction.
The YAML Pipeline facilities come to our rescue thanks to the matrix option in the strategy job condition..
This allows for simple, zero-touch permutations. An example is the one above: two OS, with two runtimes depending on the version:
trigger:
- master

strategy:
  matrix:
    'Ubuntu 16.04':
      image: 'ubuntu-16.04'
      dotnetcore: '2.2.x'
    'Ubuntu 18.04':
      image: 'ubuntu-18.04'
      dotnetcore: '3.1.x'
    'MacOS X High Sierra':
      image: 'macos-10.13'
      dotnetcore: '2.2.x'
    'MacOS X Mojave':
      image: 'macos-10.14'
      dotnetcore: '3.1.x'
    'Windows Server 2016':
      image: 'vs2017-win2016'
      dotnetcore: '2.2.x'
    'Windows Server 2019':
      image: 'windows-2019'
      dotnetcore: '3.1.x'

pool:
  vmImage: $(image)

variables:
  solution: '**/*.sln'
  buildPlatform: 'Any CPU'
  buildConfiguration: 'Release'

steps:
- task: UseDotNet@2
  inputs:
    packageType: 'sdk'
    version: $(dotnetcore)

- task: DotNetCoreCLI@2
  displayName: "Restore"
  inputs:
    command: 'restore'
    projects: '**/*.csproj'
    feedsToUse: 'select'

- task: DotNetCoreCLI@2
  displayName: "Build"
  inputs:
    command: 'build'
    projects: '**/*.csproj'

- task: DotNetCoreCLI@2
  displayName: "Unit Tests"
  inputs:
    command: 'test'
    projects: '**/tests/UnitTests/UnitTests.csproj'

- task: DotNetCoreCLI@2
  displayName: "Publish Infrastructure"
  inputs:
    command: 'publish'
    publishWebProjects: false
    projects: '$(Build.SourcesDirectory)/src/Infrastructure/Infrastructure.csproj'

- task: DotNetCoreCLI@2
  displayName: "Publish ApplicationCore"
  inputs:
    command: 'publish'
    publishWebProjects: false
    projects: '$(Build.SourcesDirectory)/src/ApplicationCore/ApplicationCore.csproj'

- task: DotNetCoreCLI@2
  displayName: "Publish Web"
  inputs:
    command: 'publish'
    publishWebProjects: true

- task: CopyFiles@2
  inputs:
    SourceFolder: '$(Build.SourcesDirectory)'
    Contents: |
      src\ApplicationCore\bin\Debug\netstandard2.1\ApplicationCore.dll
      src\Infrastructure\bin\Debug\netstandard2.1\Infrastructure.dll
      src\Web\bin\Debug\netcoreapp3.1\Web.dll
      src\Web\bin\Debug\netcoreapp3.1\Web.Views.dll
    TargetFolder: '$(Build.ArtifactStagingDirectory)'

- task: PublishPipelineArtifact@1
  inputs:
    targetPath: '$(Build.ArtifactStagingDirectory)'
    artifact: '$(image)'
    publishLocation: 'pipeline'
The build component of the pipeline is the same. All I did is adding the matrix on top, and force the explicit version of the .NET Core SDK I want to use for my target build so to dynamically enable different versions.
Let’s take a look at the matrix itself in detail:
strategy:
  matrix:
    'Ubuntu 16.04':
      image: 'ubuntu-16.04'
      dotnetcore: '2.2.x'
    'Ubuntu 18.04':
      image: 'ubuntu-18.04'
      dotnetcore: '3.1.x'
    'MacOS X High Sierra':
      image: 'macos-10.13'
      dotnetcore: '2.2.x'
    'MacOS X Mojave':
      image: 'macos-10.14'
      dotnetcore: '3.1.x'
    'Windows Server 2016':
      image: 'vs2017-win2016'
      dotnetcore: '2.2.x'
    'Windows Server 2019':
      image: 'windows-2019'
      dotnetcore: '3.1.x'

pool:
  vmImage: $(image)
This is an example hence the simple approach - a more engineered approach would be to populate the matrix variables via other controlled variables, without requiring a change in the pipeline in case you want to change the version or the image. No other modification is required, no configuration or extra software to install. It’s all part of the out of the box experience.
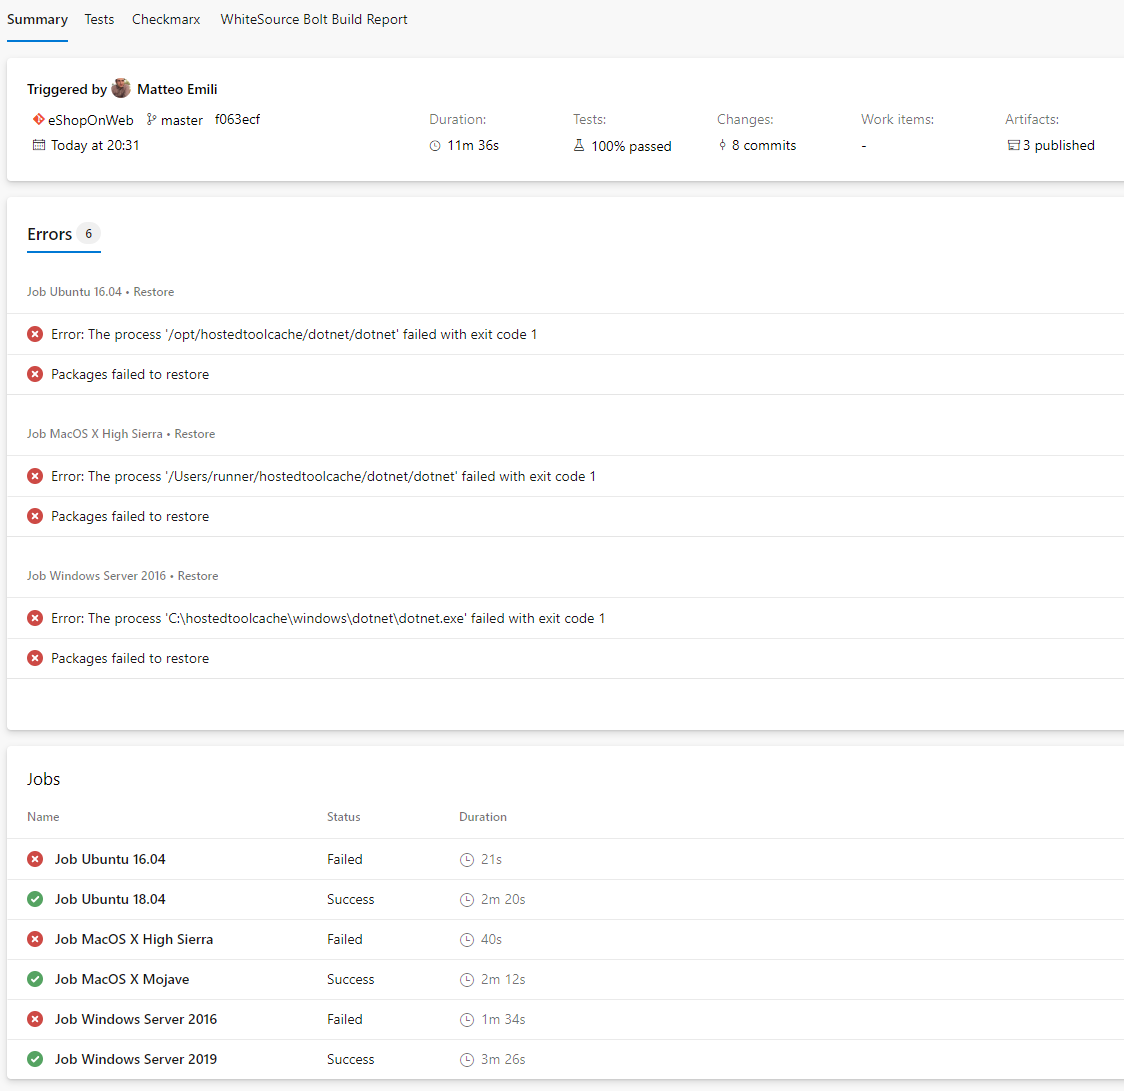
The result can be consumed really easily - the .NET Core 2.x version value I entered there doesn’t work on purpose while the 3.x does. This is the build summary for the whole set of runs, with each run clearly marked:
It also means that the effort to add or remove an environment from the matrix is all in the key-value pairs making it up. If I were to make it more complicated by adding both .NET Core versions to each OS, I could have added a template to loop for each one of them with the same image type so to have a situation like:
- Windows Server 2019 runs with .NET Core 2.2.x
- Windows Server 2019 runs with .NET Core 3.1.x
- Windows Server 2016 runs with .NET Core 2.2.x
- Windows Server 2016 runs with .NET Core 3.1.x
- …
It is a strong display of power for the pipelines as code approach - I am moving more and more things over there, and I see little reasons to go back, smaller by the day.